Showing posts with label kigurumi. Show all posts

Friday, July 11, 2014

Paper Craft Patterns Available for Purchase!

I've received a lot of questions, since my first posts about paper craft mask making, about if I was going to give or sell any mask patterns. I was hesitant to just give away my first pattern, but I did think of a solution! I finally got off my butt and started making a few patterns that I wouldn't mind other people using, if they'd like. Well, and broke RinRin could use the pocket money, this hobby is expensive!

I'm not expecting that a ton of people want these or anything anyway, since making your own mask isn't much cheaper than just buying one. This is primarily aimed at people who want to try making a kigurumi mask, but aren't confident in their sculpting abilities. I'm more than willing to answer any questions anyone has, and of course you're more than free to ask me about making computer models and creating a new pattern yourself. But, if you're looking for something you can print and work on right away, I've got two models so far and more on the way! Think of it as a DIY starter kit.

Anyway, here are the two models I'm referring to:


Model GNT
- Typical anime face shape
- Stronger nose bridge than my other works, so your real nose has room (You can always adjust to your liking during the finishing process)
- Approx. 11in in height.

Here's a rough idea of how big it is on my body. For reference, I am 5'2". She's rather large so should look okay for all heights. If you'd like a scaled up version, feel free to ask.


 Model CHB
- An unusually young face for chibi or doll-like characters
- Approx. 12in in height

Again, size reference on me, a 5'2" (157cm) person. The inside of the head will require a lot of foam or even a support structure so it sits properly.

I'm working on a "young adult male" model currently, I don't know if anyone would be interested, but the option will be there.

By the way, it only cost me about $5 to print both of these on card stock at the FedEx office. Much cheaper than a ton of clay! You can use my tutorial for help on surfacing these, or do whatever you want.


PURCHASING PROCEDURE:
1. Send me an email at kigu-rin@hotmail.com titled "Paper Craft Pattern" or similar, and request which model you want.
2. I will email you back with my paypal address.
3. Send a payment of $15 USD, (Handle the paypal fees however you'd like) and I will email you the PDF file. That's it!

PLEASE DO -NOT-
1. Give away my patterns for free or upload them elsewhere on the internet.
2. Use my patterns as a base for a mask you are building with the intent to sell to another.
3. Duplicate a mask made from my patterns except for personal, non-commercial use.
I cannot enforce these rules, but I hope you will respect my effort and time. I reserve the right to refuse sale to any person for any reason.


ASSEMBLY TIPS:

1. I recommend starting from the nose and chin area when you put a pattern together. The nose and chin areas are easily spotted, as they are the most detailed portions of the pattern. Start from there and work outward, and you won't end up trying to glue these detailed areas in last. Believe me, it's a hassle!
2. Cut as accurately as possible, many small mistakes can turn into a big one.
3. Some flaps overlap. This is okay, just cut them apart evenly.
4. Some flaps will need to be cut much smaller than printed in order to fit with their adjacent edge.
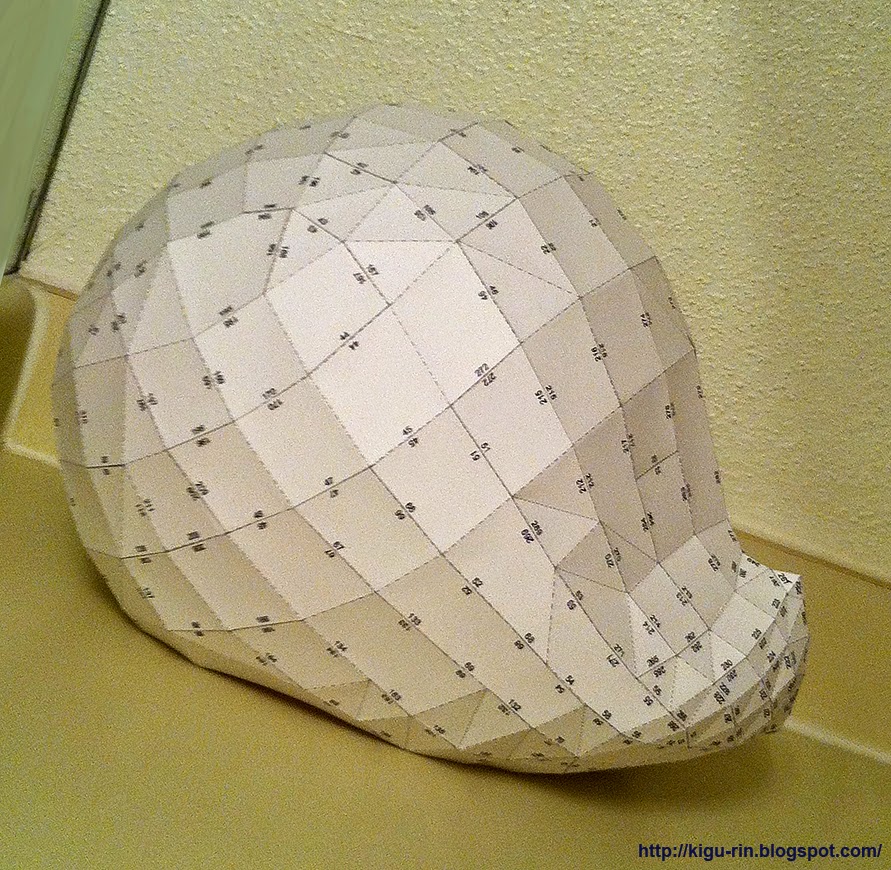
5. If your head cannot fit into the model, cut away or ignore the outermost pieces. (notice the incomplete back of my photo of GNT) If you choose to create a mold and cast the model in resin, you can cut away the FRP so that it fits your head after the fact. It doesn't need to be wearable while you're working!
6. if you must cut away on GNT, take away from the skull and not the chin.
7. The under-jaw of CHB is too long by design. Please cut away until it fits to your liking.
8. If you feel necessary, use strips of scrap paper to reenforce some areas around the hole. The under-chin of GNT seems to flatten naturally, so you may need to stiffen it with extra paper so that it rests under your jaw properly. The chin-to-neck line at profile should not be too steep!
9. Make sure your model is not warped in any way when you apply fiberglass or any other hardening agent of choice. Otherwise, it will be stuck that way!
10. Due to an error in the model, you will not need the small piece labeled 218 when assembling CHB.
11. Uneven dashed lines mean mountain fold, evenly spaced dotted lines mean valley fold.

Tuesday, July 8, 2014

Meeting with Ashley 2014! Part 1

Just a few days ago on the 5th, Ashley Yume/Nyu was in town so we met up and took some pictures! Also, Eru Chitanda from Hyouka (Made by Hui Oo) made her debut. I was really surprised to see a new mask! Anyway, here's a buncha photos. Our photography methods and my editing skills are suspect, but I hope you like them anyway.

First things first, selfies~


Ah, a cat!


Friday, July 4, 2014

Wednesday, June 18, 2014

Serena finished

Been a long time, but I'd like to show off that I've completed a new mask! One of my paper craft projects came out great!

I won't be posting any WIP images for now, because I've compiled a tutorial that will have most of those contained within it. That's for next post!

I decided to update my character choice and go for "Serena" from Pokemon X and Y. I say that in quotations because she's different from the default appearance. I have my in-game character fashioned with short brown hair and blue eyes, so that's how I made her. I'll call her Serena for convenience, mostly.


For now here's a few photos I snapped after completion, before I got her zentai, and after. Gonna work on cosplay stuff next!

Sunday, April 7, 2013

Paper Craft Mask Projects

Just as the title says, I've started on some new mask projects!

Some time ago, I started playing around with the idea of using paper craft models to create a mask from. I decided that if I could import models of my own design into Pepakura Designer 3, and print them, I could use them as a base for a mask! I'd seen this very idea on the KCS forums years back, but the project never panned out. I ended up hunting around the internet for free 3D modeling programs, and stumbled across HexaGreat 3D and 3DAce. The former was really cool, but it was too incompatible with my OS to save files. The second though, was very similar and I was able to teach myself to create some models in it!

Here's the ones I managed to make.

Using a bunch of reference images, I created what could be described as an average face in the style of the pokemon games. Mostly going with the most recent character art style.

Using that reference, I came out with a model! I tried to keep the polygons to a minimum, but enough to be able to easily smooth out the shape when I actually build it.

After that, I modeled out a cat character I really like. Matakichi from this obscure manga Namennayo! (all of these are equally low-poly, I just turned the smoother on before snapping a screenshot on a lot of these, at the time)

And after that, Kaiji!
The model went through a few iterations, the top is the final. I really enjoyed the challenge of trying to render Fukumoto's art style in three dimensions.

After modeling them out, it was just a matter of converting them into fold-able papercraft files!

They all look a little but like this. It took a while to get everything to fit right onto Letter sized paper. At the time I couldn't figure out how to turn off the dark coloring of the pieces, so it made the edge numbers hard to read printed.
 All the models were then printed onto a thick cardstock paper. Still fold-able, but sturdy. It took several hours each to build, and the cat took me two days of work because he had so many pieces.
I finished the pokemon-styled head pretty swiftly, but stopped Kaiji halfway through because he was much too small to fit on anyone's head. I set his height to the same as the girl's, without considering the difference in width.
Matakichi came out really well, he's quite big! But that's good for the intended proportions I want to achieve.

Next comes the fiberglassing. The plan is to coat the paper models in fiberglass resin, reenforce the insides with fiberglass cloth, and then use body filler to fill the facets and sand it all smooth.

I started first with Matakichi, since he was the biggest and actually most sturdy. After a few sessions, I got the whole thing coated in resin, and the inside almost completely fiberglassed. Still gotta reenforce a few more spots yet.

Some tragedy struck in the meantime though! My first model started to come apart really bad at the mouth and chin. It's hard to see from the photo, but it was getting pretty bad. I decided to scrap this one and make a new one, along with a new Kaiji.

I edited Kaiji to be wider and have a slightly smaller cranium in 3DAce, and then created a new paper craft template from that. For the Pokemon styled mask, I edited out her mouth so that there wouldn't be that weak point in the structure. The mouth can always be sculpted later. I also figured out how to print in white instead of dark gray, making it easier for the paper to absorb the resin.

 New Pokemon style and new Kaiji.

Some time during this process, I met the awesome Michael Spookshow and we've been meeting up to work on masks together! At this point, I've now gotten both these new models coated in resin, and I'm working from there. More updates soon!