Ah, it's been a while.
Have a video, too lazy to upload photos!
It's Iris in her (almost) full outfit, and my friend Ashley!
My next post is gonna be a doozy, though.
Showing posts with label Iris. Show all posts
Showing posts with label Iris. Show all posts
Thursday, October 4, 2012
Tuesday, May 15, 2012
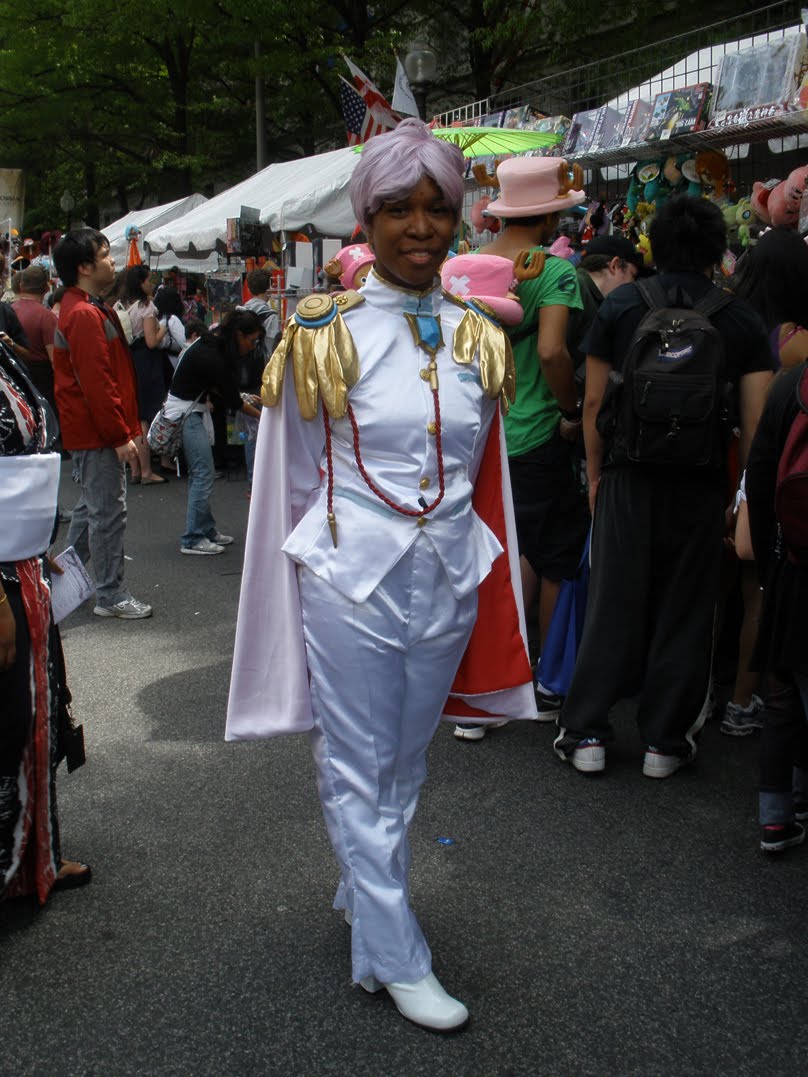
Knapcon 2012 / Sakura Matsuri

Hey there, finally getting to updating this thing.
Towards the middle of April, Jovina held her usual spring meetup, but this time under the name "Knapcon" (Kigurumi North American Perfomers Con) in the hopes to transform the get-together into a real convention! About 10 showed up, which is pretty good, all things considered. The event was in-line with the DC Sakura Matsuri, and is where we did our performing. It was a ton of fun! Meeting and chatting with everyone was also a real treat, they were all friendly and helpful and a lot of fun. I hope to go again next year, and maybe see some new faces! I think it'd be an amazing event if more and more people continue to go.
Don't have much more to say than that, we kigged in "shifts", and I got dressed up in the early afternoon, and manned a camera or enjoyed the festival otherwise. MJ and Setphanie were so helpful with my kimono.
I'd say the top photo is the best photo of me.. the rest aren't as flattering haha.


The morning shift! Stephanie, Cody, MJC, and Nerupo


I also found quite a few cosplays!


There's also super cool picture of Iris over at FestivalDC.com! (4/50)
I only posted a small portion of the full report, you can see just about all of the photos over at Jovina's website.

Monday, February 27, 2012
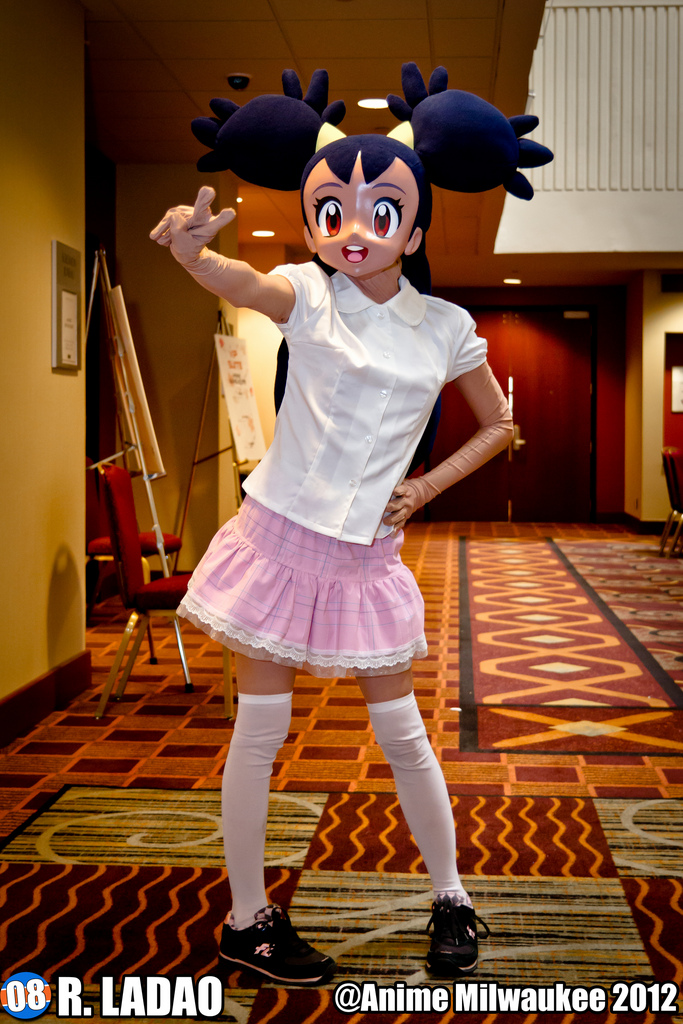
Anime Milwaukee 2
Another set of lovely photos from AMKE!
Taken by Chase Wirth, they look super awesome! Thank you again!


I think I definitely want to go to Anime Central.
Taken by Chase Wirth, they look super awesome! Thank you again!


I think I definitely want to go to Anime Central.
Wednesday, February 22, 2012
Anime Milwaukee
Went to Anime Milwaukee on a complete whim last weekend!
The bodysuit I got didn't fit, so I wasn't planning on going to any cons... but I decided the very night before to try my hand at tailoring the thing, since it couldn't be any worse off than it was, anyway. Did a pretty bang-up job, I think! I'm gonna replace it eventually, but it's nice to actually have a zentai now, quality of the stitching aside. So yeah, I threw on a school uniform I had lying around, and headed to the con! I forgot to bring my good shows though, bleh.
My camera's battery is completely dead and useless, so I couldn't get any pics myself. However, I did find a couple online after the con, and something cooler too!

Proof I need to pose in front of the mirror more often. Big thanks to a fellow con-goer for uploading this one, nabbed it from a youtube slideshow.

This awesome picture comes from this guy's gallery. Lots of photos of the other cosplays at the con.http://www.blogger.com/img/blank.gif
I show up in this video at 0:55
And finally, I got filmed by the Nostalgia Critic while he was walking around with a video camera, and show up for a second around 0:27!
http://blip.tv/nostalgiacritic/nostalgia-critic-ponyo-5974334
As for now, I've finally gotten hired, so I'm working on getting Iris's actual costume and all that jazz.
The bodysuit I got didn't fit, so I wasn't planning on going to any cons... but I decided the very night before to try my hand at tailoring the thing, since it couldn't be any worse off than it was, anyway. Did a pretty bang-up job, I think! I'm gonna replace it eventually, but it's nice to actually have a zentai now, quality of the stitching aside. So yeah, I threw on a school uniform I had lying around, and headed to the con! I forgot to bring my good shows though, bleh.
My camera's battery is completely dead and useless, so I couldn't get any pics myself. However, I did find a couple online after the con, and something cooler too!

Proof I need to pose in front of the mirror more often. Big thanks to a fellow con-goer for uploading this one, nabbed it from a youtube slideshow.
This awesome picture comes from this guy's gallery. Lots of photos of the other cosplays at the con.http://www.blogger.com/img/blank.gif
I show up in this video at 0:55
And finally, I got filmed by the Nostalgia Critic while he was walking around with a video camera, and show up for a second around 0:27!
http://blip.tv/nostalgiacritic/nostalgia-critic-ponyo-5974334
As for now, I've finally gotten hired, so I'm working on getting Iris's actual costume and all that jazz.
Tuesday, November 8, 2011
Axew, Get in my Hair!
All right, here comes the fun part! Well, not all that fun. Took me a good while to do.
Basically, time to get started on the main parts of the hair!

I created a pattern which is a larger version of a similar pattern I previously tested. All the fleece is properly cut out.


Stuffing and hard styrofoam are the next ingredients.

I cut the Styrofoam into a useable shape, then inserted the bolts which are what attaches them to the head. Don't have a picture of those. Then, I stuffed the oblong shapes with the Styrofoam and polyester fiberfill.

Made simple shapes for the lumps on the pigtails, stuffed them, and hand-stitched them onto the large forms.

Completed and inserted!
Onto the main ponytail. This took a lot of pre-planning time. I think I was brainstorming it every night.

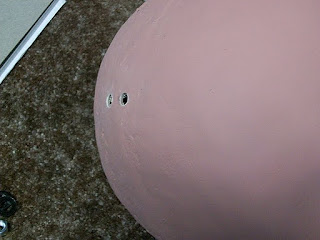
The inside of the hair is to be stuffed with a large, egg-shaped plastic balloon. It's an inflatable made of four pieces, so I traced a 1/4th section and then modified that to have an extended top. Took a lot of measurements during this process.

The result is a big old bag! There is a zipper installed at one of the seams, so I can freely remove and replace the balloon, should I need to travel.


Pinned back the parts I left unglued and attached the hair like the drawing. The fabric of her main hair is two layers of fleece thick, so what I did was glue the first layer down underneath the flaps, then cut the outer layer to match with the bottom of the flaps before gluing those down. Kinda hard to explain, but basically it's so the transition from thinner scalp hair to thicker ponytail hair is less noticeable.


Not bad! The fabric gets a bit bunched up in places near the top, but I suppose it can't be helped. I'm pleased with the overall silhouette.
Final things to do:
- Cover padding in fabric, glue padding in place
- Bulb shape at the bottom of ponytail
- Yellow hair clips and hair band
- Tongue and teeth
- Adding adjustable strap behind hair
Basically, time to get started on the main parts of the hair!

I created a pattern which is a larger version of a similar pattern I previously tested. All the fleece is properly cut out.


Stuffing and hard styrofoam are the next ingredients.

I cut the Styrofoam into a useable shape, then inserted the bolts which are what attaches them to the head. Don't have a picture of those. Then, I stuffed the oblong shapes with the Styrofoam and polyester fiberfill.

Made simple shapes for the lumps on the pigtails, stuffed them, and hand-stitched them onto the large forms.

Completed and inserted!
Onto the main ponytail. This took a lot of pre-planning time. I think I was brainstorming it every night.

The inside of the hair is to be stuffed with a large, egg-shaped plastic balloon. It's an inflatable made of four pieces, so I traced a 1/4th section and then modified that to have an extended top. Took a lot of measurements during this process.

The result is a big old bag! There is a zipper installed at one of the seams, so I can freely remove and replace the balloon, should I need to travel.


Pinned back the parts I left unglued and attached the hair like the drawing. The fabric of her main hair is two layers of fleece thick, so what I did was glue the first layer down underneath the flaps, then cut the outer layer to match with the bottom of the flaps before gluing those down. Kinda hard to explain, but basically it's so the transition from thinner scalp hair to thicker ponytail hair is less noticeable.


Not bad! The fabric gets a bit bunched up in places near the top, but I suppose it can't be helped. I'm pleased with the overall silhouette.
Final things to do:
- Cover padding in fabric, glue padding in place
- Bulb shape at the bottom of ponytail
- Yellow hair clips and hair band
- Tongue and teeth
- Adding adjustable strap behind hair
Wednesday, November 2, 2011
Eyes and Hair
Onward!
Finally managed to catch my mom's boyfriend with some free time recently, so we got the holes drilled in. These are where I'll be attaching her large pigtails via bolts.
They're a little uneven on both sides despite my efforts... but that can be compensated for later. I didn't take any photos, but I later got a coat of clear matte finish on her. Unfortunately it's more shiny than matte... but not too bad.
Next, I opened up photoshop, drew up some eyes, then went down to the office max to get them printed on card stock.

It's a good thing I made several sheets, I made plenty of mistakes! I proceeded to trash the basement during the construction of the eyes and lashes. Totally wore out my x-acto knives too.

目! The eyelashes are cut from a black plastic folder. Thanks to Wyu for that idea.

The eyebrows are just printed on regular paper and backed with leftover card stock. I eventually used a small black inking pen (not ball point) to carefully fill in those white areas where the vision holes were cut out. I tried to use a black marker the first time around but it bled really badly. The pen bled a tiny bit too, but to a much smaller and more harmless degree.
And now the scary part... her hair!

A second trashing of the basement via fleece storm began. I used a pencil to section the scalp as a guide for cutting out the pieces. Fabric is very hard to work with! Even when you line it up to a paper guide, it flops all over.


Building up... my process was totally unscientific. Basically, laying bits of cloth over the guide areas, estimating where to cut, and adjusting accordingly. I managed to make very few mistakes, somehow! Took a while, though.

Everything glued down! I'm so close to completion, I can taste it!
Finally managed to catch my mom's boyfriend with some free time recently, so we got the holes drilled in. These are where I'll be attaching her large pigtails via bolts.

They're a little uneven on both sides despite my efforts... but that can be compensated for later. I didn't take any photos, but I later got a coat of clear matte finish on her. Unfortunately it's more shiny than matte... but not too bad.
Next, I opened up photoshop, drew up some eyes, then went down to the office max to get them printed on card stock.

It's a good thing I made several sheets, I made plenty of mistakes! I proceeded to trash the basement during the construction of the eyes and lashes. Totally wore out my x-acto knives too.

目! The eyelashes are cut from a black plastic folder. Thanks to Wyu for that idea.

The eyebrows are just printed on regular paper and backed with leftover card stock. I eventually used a small black inking pen (not ball point) to carefully fill in those white areas where the vision holes were cut out. I tried to use a black marker the first time around but it bled really badly. The pen bled a tiny bit too, but to a much smaller and more harmless degree.
And now the scary part... her hair!

A second trashing of the basement via fleece storm began. I used a pencil to section the scalp as a guide for cutting out the pieces. Fabric is very hard to work with! Even when you line it up to a paper guide, it flops all over.


Building up... my process was totally unscientific. Basically, laying bits of cloth over the guide areas, estimating where to cut, and adjusting accordingly. I managed to make very few mistakes, somehow! Took a while, though.

Everything glued down! I'm so close to completion, I can taste it!
Monday, October 24, 2011
Face Painting
Got Iris all painted a few days ago. I gathered my materials and got started!
 While getting paint at Menards, I found something really cool! It's a spray gun bottle that works like spray paint but you can put any paint color inside. This solved my problem of needing to buy an airbrush. The folks at Mendards matched the color I wanted perfectly too, so that was really convenient.
 First, a coat of primer. I should point out that the man in that photo, my mom's boyfriend, has been SUCH a huge help, especially for this part. He helped me out a lot, getting me set up in his spray booth (along with my uncle) and sticking around for the whole process. I ran out of my own primer here, and he went to get me some more.
 And then after the first coat of brown, he grabbed his hole filler putty and we filled in any newly-discovered mistakes.
 But then, tragedy struck! I bumped the spray can with my elbow and the glass container broke all over. Of course, being the handyman he is, mom's bf said "Oh that's no problem, let me pull out the air compressor."
 I didn't know it before, but he had a big spray gun! It had lots of valves: one to control airflow, one for paint intake, and one for spray size. He cleaned it up for me and we continued work with a much more efficient tool.
 Second and third coat!
 We got a whole 4 or 5 coats on this darn thing. The camera and florescent lights make her skin look a lot lighter than it is.
 This photo at home shows her skin color a little more accurately, still sorta light though.
 Next, mouth paint! I pulled out my old acrylics and mixed up a good color.
 Also painted the inner parts of the eyes black. Not all of it, just where the eyelashes are going to sit.
Now all that's left is to apply a coat of finish, and to make her eyes, tongue, and teeth. Then, the task of her hair.
Subscribe to:
Posts (Atom)
