This is going to be a "How To" for beginners wanting to make their first kigurumi mask, and who want to base it off of an existing anime, game, or manga character. If you're going to make an original character, I'm sure some of these tips can help too.
Anyway, let's start at the very beginning.
Forget Everything You Know About Human Facial Anatomy
I'm serious! Later on I'm going to say some things about eye-height and ear positioning and jaw-lines that relate to real human anatomy.... but everything else, please forget it!Let me show you why.
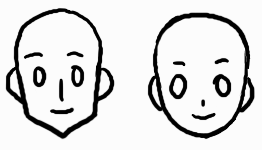
What if I added anime eyes to a realistic facial sculpt?
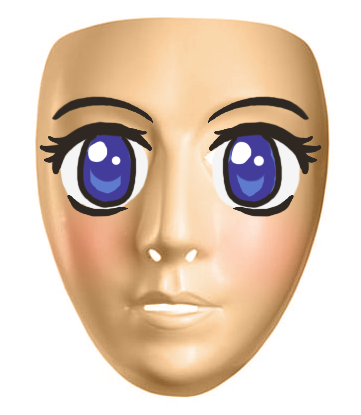
The horror! As you can see, this just looks wrong in every way. A defined nose bridge, fully sculpted lips, full cheeks; these sorts of things have no place on a face with huge, bubbly eyes.
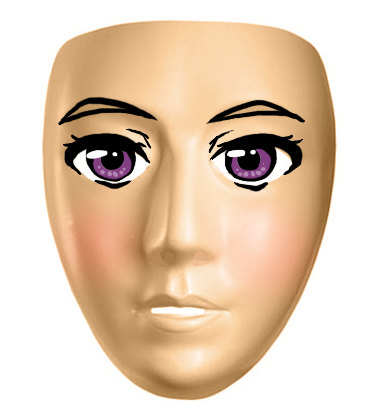
Even when I create eyes that are more mature and about the same size as real eyes... something looks off. Real faces simply have too much detail. We're making cartoons, not dolls, after all! (If you really want to make a doll, this tutorial isn't for you.)
Let's break it down.
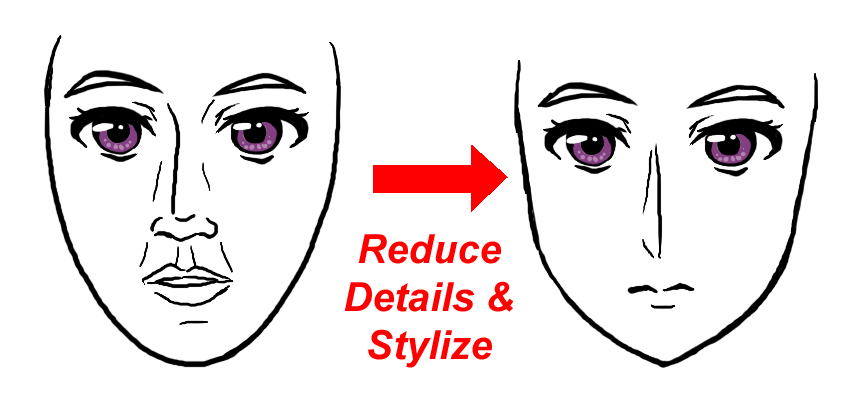
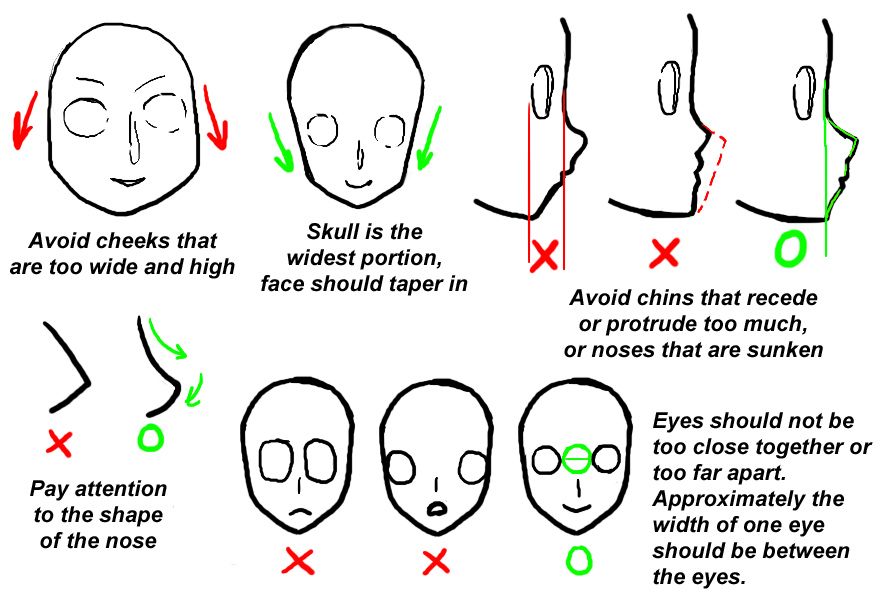
In order for this face to be anime, you have to reduce details and stylize them. Pointier chin, lowered cheek curves, less defined nose bridge.
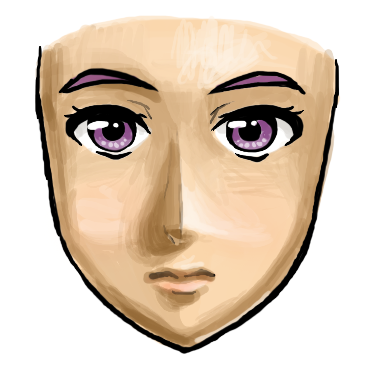
This looks much better as an anime-styled face, even if its proportions are closer to that of a real human. Note the shallow nose bridge and smooth cheek curvature.
Most characters will have little-to-no nose bridge after a certain point.
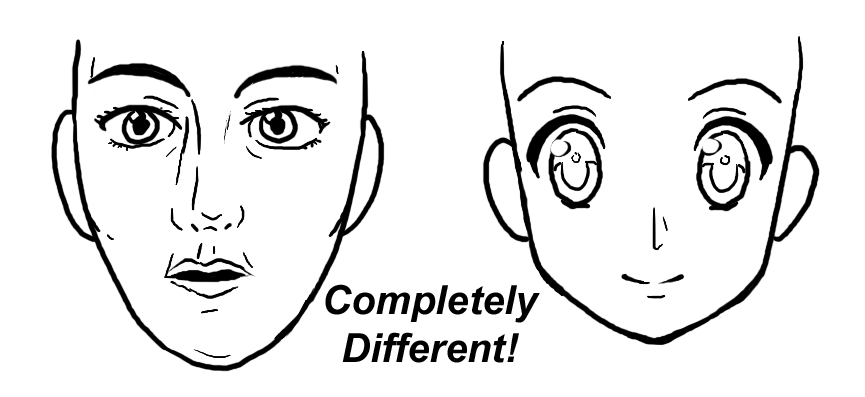
Anime and real faces are completely different! Keep this in mind when starting your sculpt, please!
With that out of the way, let's get to actually creating the character you want to create.
Referencing your Character:
Know what character you want to cosplay? Great. The first step is to google it!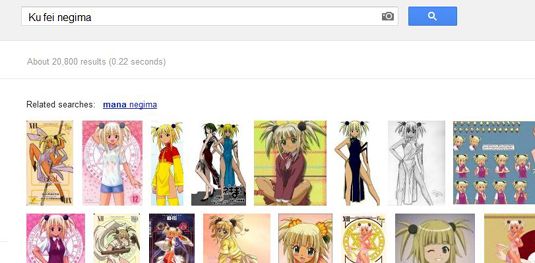
I asked a friend to name an anime character at random, and this is who I got.
Pick out some pictures that you like best. Try to find ones that give you a clear view of the character and the art style you want to emulate.
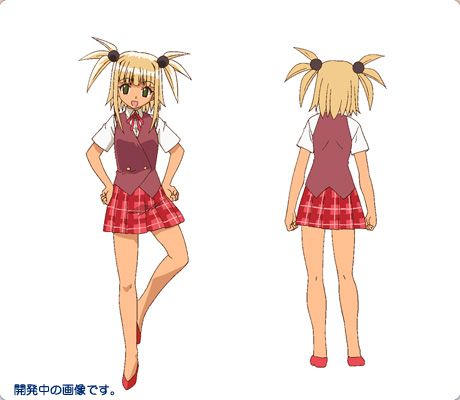
If you can find a character sheet like this, that's even better. The face on this one is too small to use, but there's many in-depth turn-arounds of anime characters that you can find. If you can't find any, try to use official art, cover art, or things like that. Many official art books have these character sheets.
DO NOT USE ANIME SCREENSHOTS OR FAN ART. These will most likely be off-model and not what you're looking for. Some screencaps can be okay, but only use them if you're confident in your ability to judge quality.
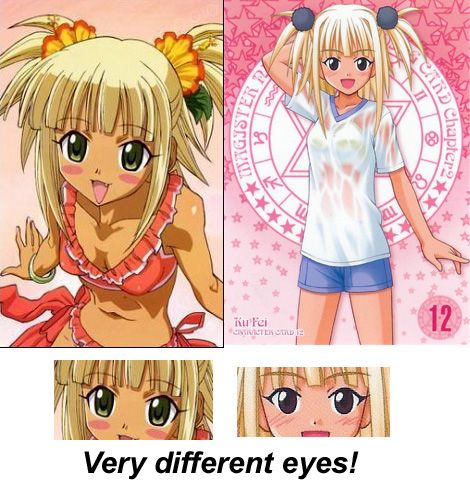
I've chosen these two images as my favorites. However! Look at how different they are. The former seems to be some kind of promotional material, while the latter is a manga cover. The eye size and style are quite different!
For now, let's say that me - a hypothetical Ku Fei fan - likes the eyes on the first picture from the anime as opposed to the manga. However, I'm going to use the second image for the face shape, because it offers a clear, frontal view of the character's head. It's also the original artist's style, so that helps. Use caution when combining multiple images. You only want to use as many as necessary to give you a good reference of your character.
The next step after compiling your images is to use them to make a base drawing!
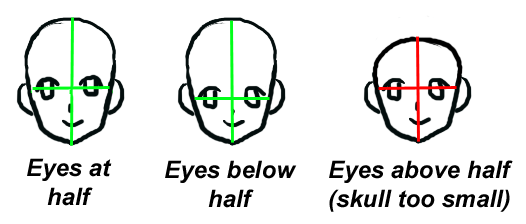
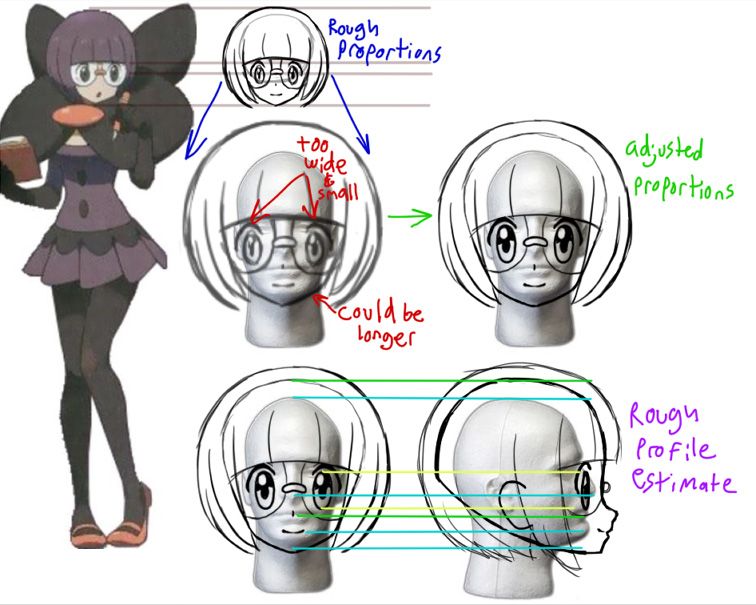
First, trace the head. Estimate where the skull is going to be. If you're stuck, remember that eyes are generally in the center of the head (not the nose!). Child and young adult characters almost always have the eyes lower than the center, so the top of the skull should be anywhere from twice the height of the eyes to the chin or more. Alternatively, you could just estimate the thickness of the hair and draw the skull underneath that point.
NEVER make the forehead too small or too flat on the top! Anime hair changes the perceived shape of the skull a lot, so don't do this. I tend to make my skulls a little on the large side, so you could get away with smaller, for this character. I prefer not to have to pad the volume of the hair later, but that's up to you.
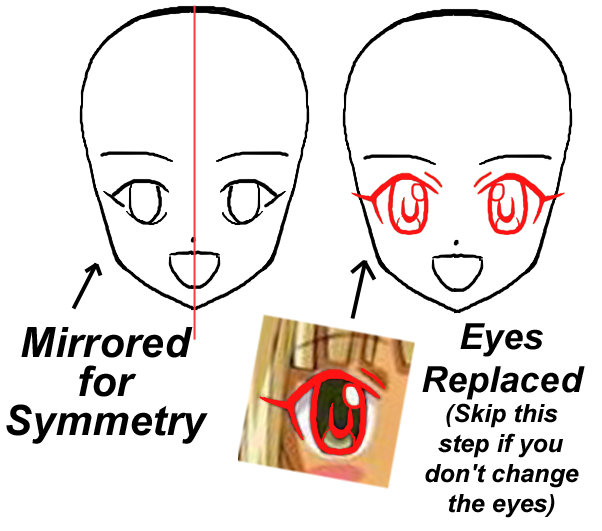
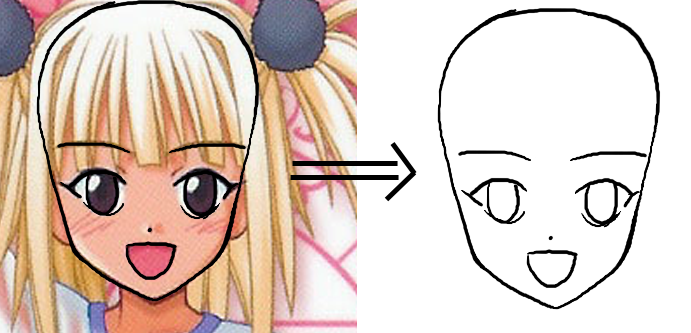
The face I traced was obviously asymmetrical, so here I've mirrored one side of the image and lined it up nice. The face may seem a little wide or thin when you mirror it, so try to compensate for that. After that, I traced the eyes I liked and pasted them onto the face. It doesn't matter that the shines are flopped, that's not important for now. The eyes in the anime style are a bit bigger than in the manga image, so they're a bit larger (maybe too large?). Either way, it looks pretty accurate! Now to create the profile.
For more eye placement tips, if you don't choose to use the same eyes as the facial reference, see later sections of this tutorial. Usually you'll keep the same eyes, though.
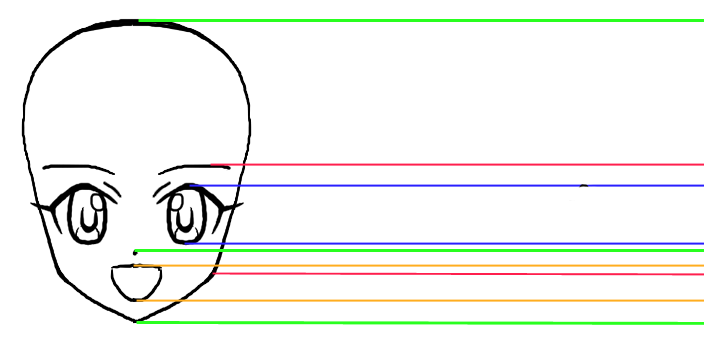
Create guidelines along all the important parts of the face. Top of the head, bottom of the jaw, top and bottom of the eyes, mouth, nose, etc.
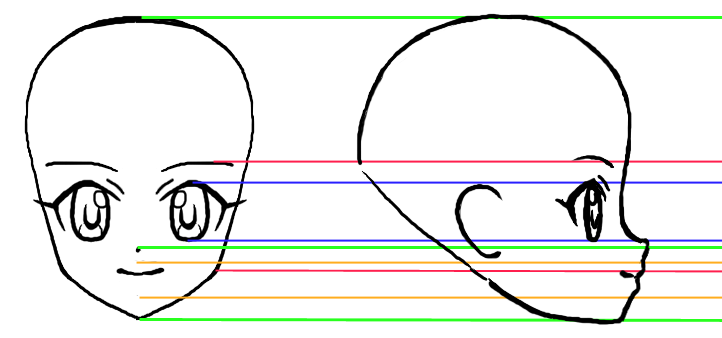
Using this, you can create a profile! I decided the open mouth was a bit too big, so I turned it into a closed mouth. Remember to think about what expression you want!
"Whoa, that's too fast!" you say? "I can't draw that on my own!". Well, that's what the guidelines are for, they helped me know where to place each object so that it lines up in 3D. How far left or right to make each detail is the hard part.
For starters:
The head may be a bit longer than it is wide, and circular. That's not always the case, but you can bet on it.
The jaw shape should be like this:
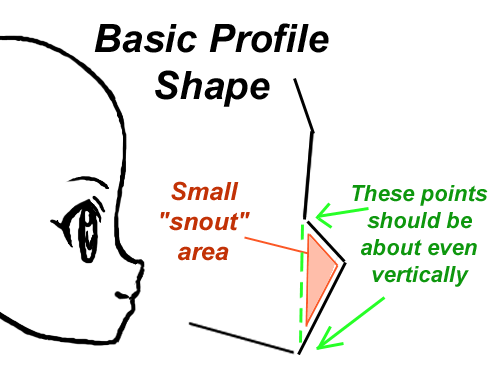
The chin should line up somewhere between the forehead and the deepest part of the nose curve. The nose should be the part that protrudes the farthest. Remember to keep it lined up with your grid. The depth of the eyes is sort of arbitrary. You don't want them right up against the front in your actual sculpt, but generally anime eye sockets are pretty shallow.
As for the ears:
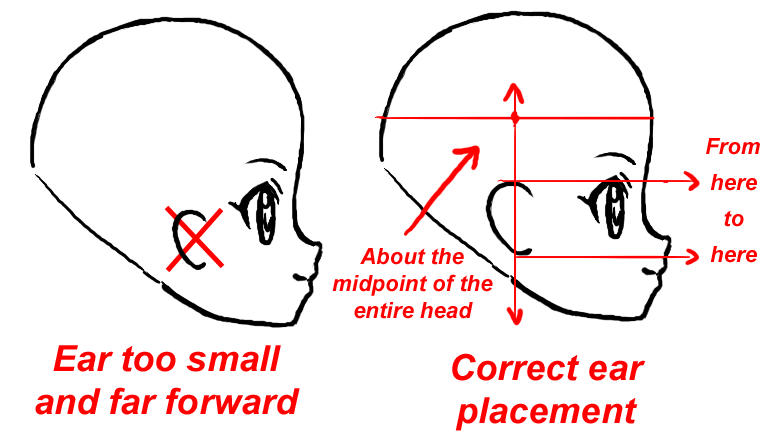
Don't make them too small or too close to the eyes. Ears sit midway between the face and the back of the head. Ears are generally as tall as the height between the top of the eyes and the bottom of the nose. Anime ears are generally pretty smaller and lower, but that doesn't mean you can make tiny baby ears. Don't be afraid to make them a little larger. They should be at LEAST the size of your own ears. Some super tall eye shapes won't work for the height measurement, but it's a good guideline. If your character wears glasses, keep the ears in mind even more.
But what if the character doesn't have very good reference images? There are still ways to create a good image.
This is a reference I did for a character that had no clear frontal image, doesn't appear in an anime, and only has one main piece of official art. Using the same guideline technique used for making the profile, I was able to create a reference image. The first draft looked a little wonky, but that was easily altered. Have some peers review your drawings to tell you if anything looks off. I actually used an image of a foam head to help make it ideal for wear.
However: DO NOT LINE THE EYES UP TO YOUR OWN EYES. They will be too close together. Some vision has to be sacrificed for younger-looking or wider-faced characters. You are not seeing out of their pupils so do not line it up that way.
Anime characters have a wide variety of facial structures, so reference yours carefully to get the most ideal likeness! Many of my tips might have exceptions depending on the character! If all else fails, pay an artist to do it! :P
Referencing Your Drawing in the Real World:
It's almost time to start sculpting! But first, we need to put these reference images to use.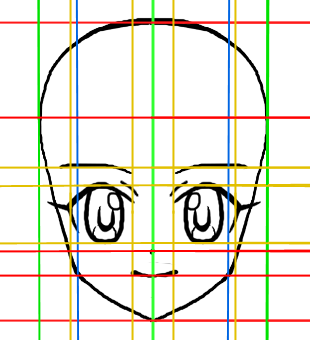
Make a bunch of crazy lines like this. I've marked various proportions. The widest and thinnest points, nose, mouth, chin, all of that. You'll want the X and Y position of everything. Do the same for the profile image if you must. This is an image you are going to print at ACTUAL SIZE. That way, you can use it to take real measurements with a ruler!
Don't know what size to print it at? Time to make an estimate.
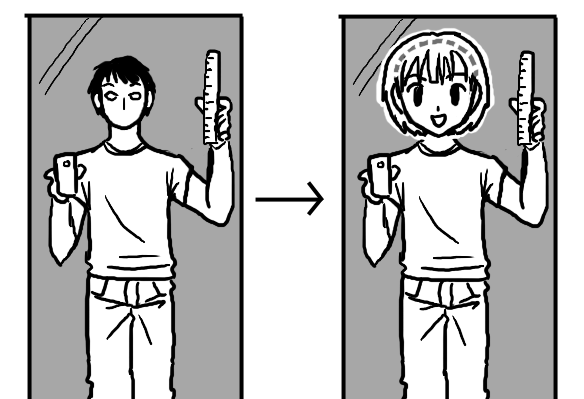
There's many ways to do it, but I would suggest taking a full-body photo of yourself with a ruler, and overlaying your character's head onto the image. You can freely adjust the size of the character's head until you feel the head size creates the correct proportional illusion.
Once you have an idea of the size you want, print up your images as close to that size as you can get. For my kigurumi mask, it took me about five different tries to get it right. I eventually digitally split up the image into two equal-sized files and printed it on two separate papers each, which I taped together.
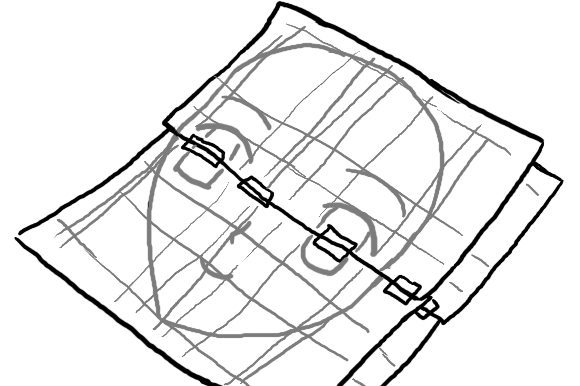
Eventually you'll have something like this. Ideally, it will be almost the same height as what you want your mask to be.
Now you have everything you need to reference your drawn images for the sculpt.
Creating your Character in 3D:
Even though we have a front and a side reference, imagining a 2D form in 3D is still hard! Here are a few tips I have about that.1. Reference Figurines.
Have figurines on hand? Great! Have figurines of your chosen character on hand? Even better! Even if you only have one or two, they're a great way to get acquainted to how you should be sculpting your head. Study how the cheeks curve and how the jaw flows, things like that.
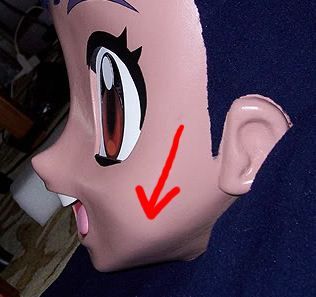
However, beware of their small size. Many figurines don't have the area towards the ear sculpted well (because the hair is just in the way) or the under-jaw may incline too steep. That's for you to watch out for.
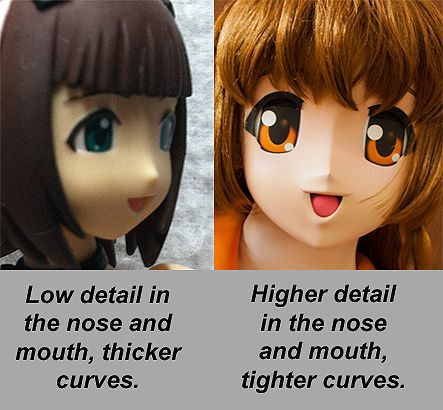
Figurines also have less detail and much softer curves. Notice how pointed the nose is on the kig mask on the right, and how much more detail is in the lips compared to my Revoltech Haruka.
2. Envisioning the cheek curve.
Hey wait a second, we have a front view and a side view, but no 3/4ths!
This is true. For the cheeks, your best bet is to reference images of your character to see how the cheeks are shaped. Anime characters have many different kinds of cheek structures, and it varies by the artist, so make sure your cheek line matches your desired art style.
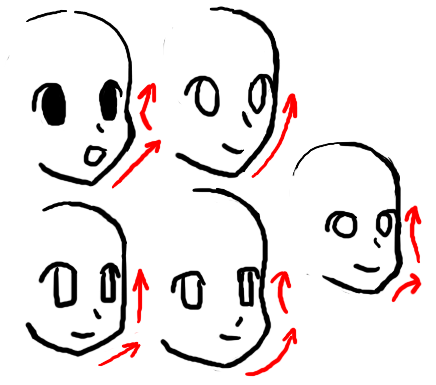
There are a lot of different kinds of cheeks. Pay attention to your chosen art style.
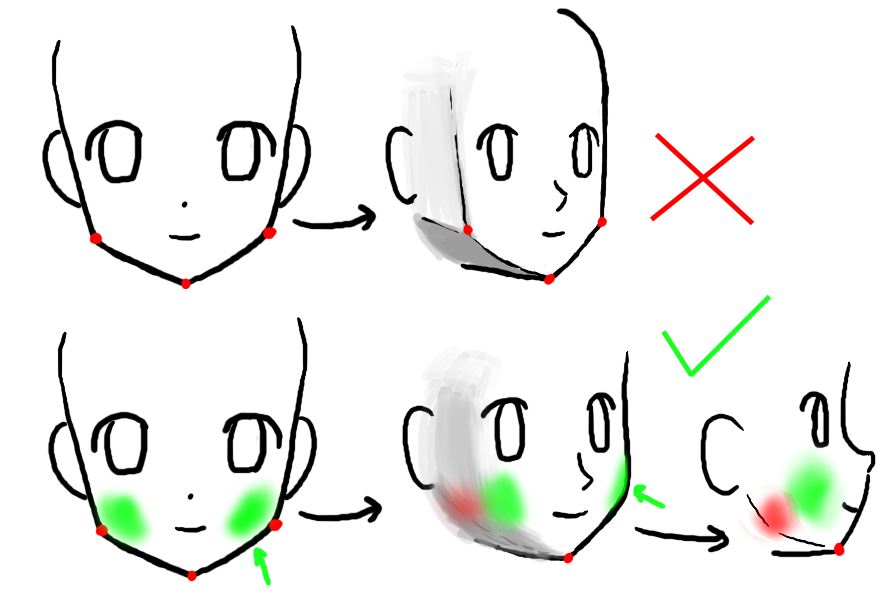
This diagram is a bit difficult, but I'll try to explain it. Basically, notice how many anime faces have an "upside-down pentagon" shape to their jaw? The two points above the chin are not formed so easily, however. You could cheat and create a shape like in the first example, but something like that will only look good from the front. Really, the two side points are formed by the jawline that recedes back, and it's not just a single point. The entire area contributes to that shape. The areas I marked in green are the areas that when turned, define the shape of the cheek. While you're sculpting, look at it from all angles to make sure you're getting a good turnaround.
Not all characters have these points, though. How round or "pointy" the face is depends on the character as well.
For more "chibi" or young characters, you can cheat a little bit. See how Iris has a slightly noticeable "point" where the sides of the cheeks are defined? It's not as bad as in my drawing at the top, but it's something I hope to improve on next time. (Her ears also ended up way too small and forward, but the way I sculpted it forced them to be there.)
3. Lips.
You're on your own, champ.
Well, okay. I'm just not a very big expert on them.
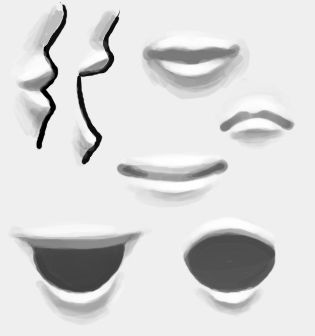
Here's a few mouths I painted to give you an idea of how they work in 3D. What style to use depends on your character and expression. Try to keep closed mouths from looking too puckered or pursed. Anime style lips are small, but too small and they may look bad or masculine. This is a hard thing to master for any artist, so keep at it. Reference figurines and other masks as much as possible.

When sculpting an open mouth, avoid having lifted sides, it will make the mouth look like a crater. The lips protrude some, but the sides will look best when flush with the rest of the face.
4. Still Having Trouble?
If you're still unsure about diving into sculpting, create some maquettes!
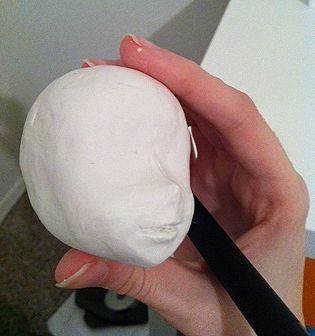
Miniatures are a tool that have been used by sculptors since forever! Making a mini version can help you practice creating the more difficult shapes in 3D.
5. Common Mistakes.
Here's a collection of a few common mistakes I see among beginner mask makers.
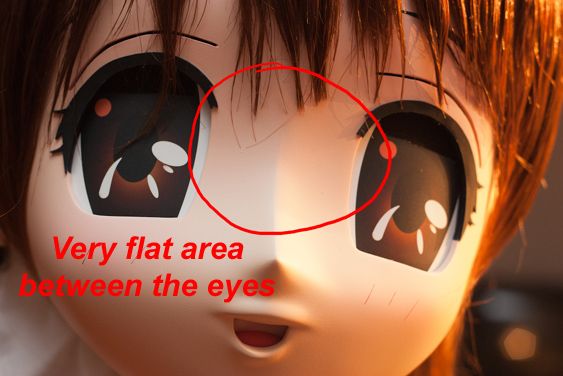
While building up clay, it can be easy to accidentally make things too small or too big. Reference your drawings constantly! Take many measurements! Pay close attention to the shape of your nose. It should flow smoothly into the face, don't just let it look stuck on there. Avoid nose bridges that are too deep or too tall.
Some characters with very large eyes can flub the "one eye width" rule a little. But too much and it will look bad. My example character, Ku Fei, has eyes that are slightly closer together than that.
6. Check for Asymmetries.
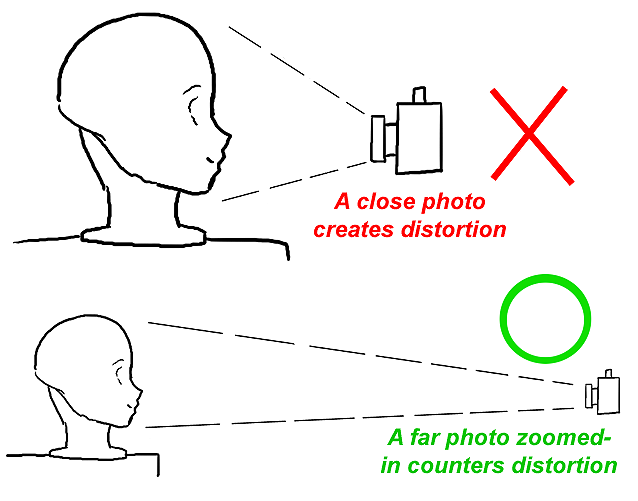
A camera is a great tool for checking for mistakes that you can't see with your naked eye. Take a photo for your work and you can even overlay your reference pictures on top!
Remember, don't take a picture if a wide view, it will distort your picture and create fish-eye effect. Stand far back from your work and zoom in to take a photo.
Eyes Eyes Eyes!
The number one most important part of your mask! (in my opinion). This is another part of creating your character in 3D, but I think it needs a section of it's own. Remember to use your reference sheet to make sure the eyes are positioned properly.1. Sitting the Eyes on the Head.
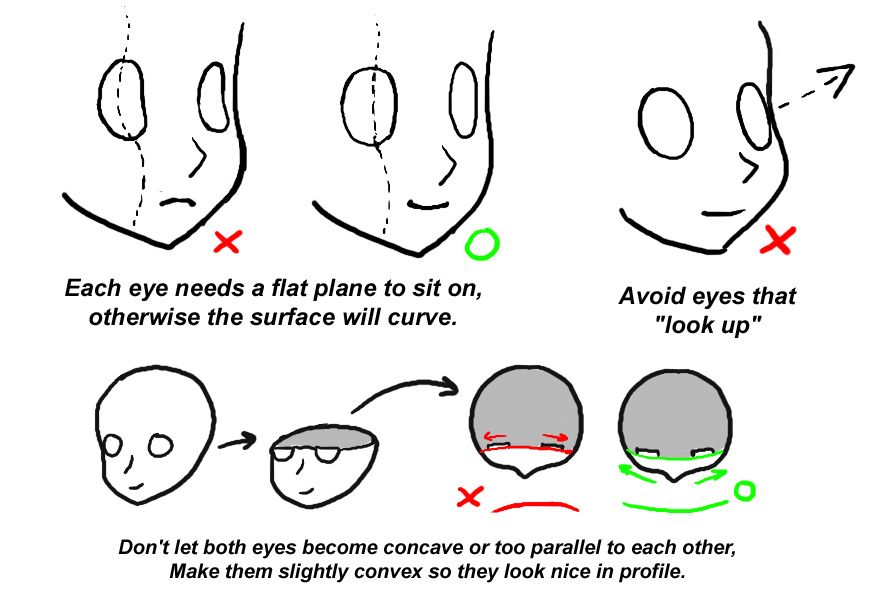
Whether you choose to sculpt the eye holes first, or wait for later to cut them out, beware of any of these follies. You will have a hard time inserting eyes into or onto your mask if the place where they should go is too curved or not in the right position.
Keep in mind which method you want to use. These aren't the only ways to put eyes on, either.
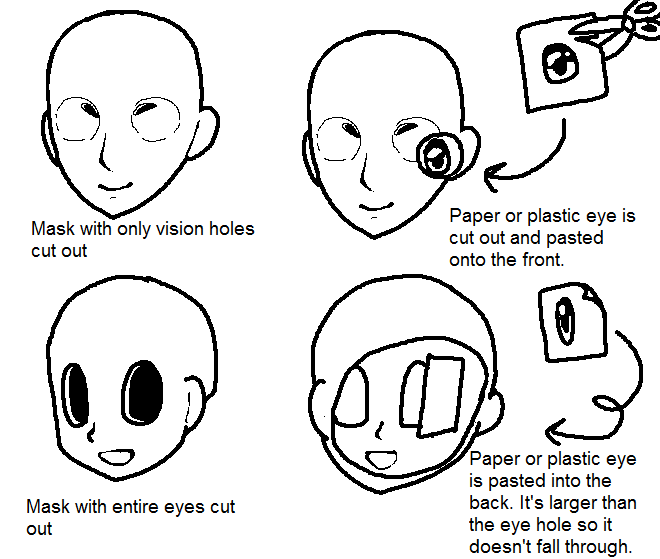
2. Vision.
When it comes to actually wearing the mask, there are several places you can put the eye holes. Depending on the shape and size of the character's eyes, you may need more or less.
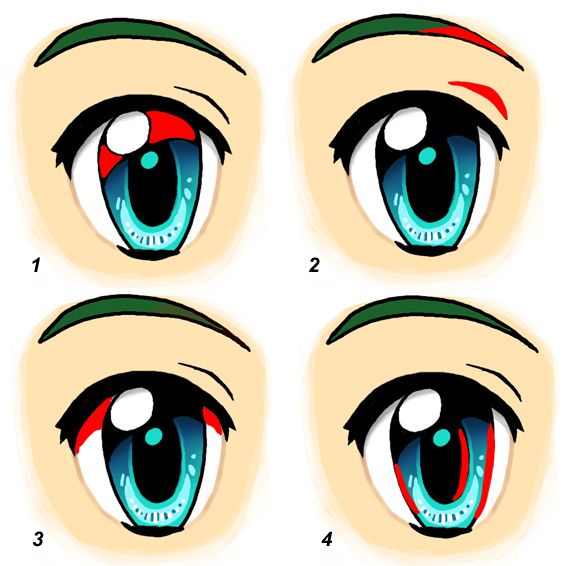
- This is the most common place to put the eye holes. Many masks only need this hole for reasonable vision.
- If your character has very low eyes compared to your own, additional holes in the "crease" of the eyelid or hidden in the eyebrow can be used.
- Some white mesh can hide vision holes just under the lashes without being too obvious.
- If your peripheral vision needs help, slits along the dark rim of the iris or slits on the pupils work well. Avoid cutting out the entire pupil unless the character has tiny eyes. It will look bad otherwise, and usually that area is too low to be helpful.
3. The Importance of Accurate Eyes.
Eye accuracy is really important. How important?
Let me demonstrate.
Can you guess this anime character?
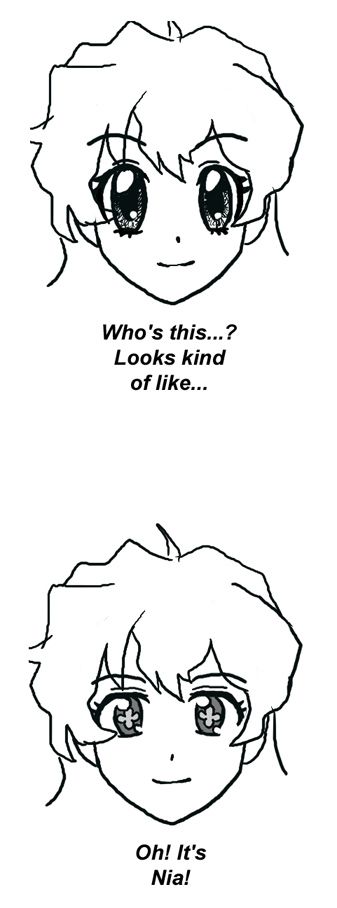
It may have looked kind of like Nia in the first drawing, but correctly sized and drawn eyes really hit the image home. The hair can only give so much away.
Let's try a more extreme example. We'll start with a face with common hair and generic eyes.
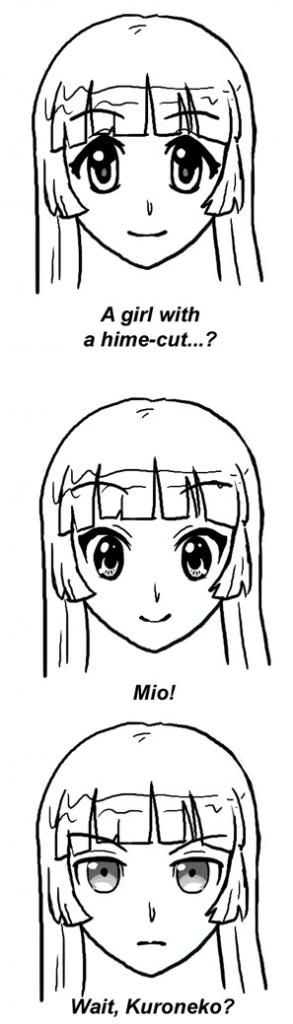
That top picture could have been anyone!
Even if the hair style or even the jawline doesn't perfectly match the character, the eyes make a huge difference! Eye accuracy can make or break a mask, in my opinion, so pay utmost attention to your measurements. When the time comes to create the eyes for your mask, use a template or printed out design to retain as much accuracy as you can. Most art programs allow you to create images in real-world sizes, so use those programs to draw out your eyes at the correct size, if you choose to print them or print a template.
From Here, Good Luck!
...And I think that's everything I wanted to cover!All I can hope is that with some of these tips, you can avoid a first mask that looked like MY first try.
Eck! Look at all the beginner mistakes. The nose bridge is too prominent, the face is too flat, the nose doesn't flow well into the cheeks, the mouth looks weird, and the cheeks are too high and defined. Too much like a real human!

On my second attempt, I made huge improvements! I've still got a ways to go, but study goes a long way.
I hope this has been helpful to any new mask makers out there, or even somewhat useful to intermediates! The most important thing I want to teach everyone is how to observe. When it comes to any form of art, learning how to observe the world around you is the most useful thing anyone can know.
Thanks for your time!
*Images of Nagisa and Mirai used with permission by owners. Thanks for the editing help DraconPern!

7 comments:
Our Kigurumi Shop has one of the Largest Japanese Animal Pajamas Collection. Our Kigurumi Onesie are the perfect pajamas and kigurumi cosplay outfit. It is cheap and low price, and Kigu Kawaii also offer wholesale discount on bulk purchases.
Kigurumi Pajamas, Kigurumi Shop, Kigurumi Store
Thank you for this very useful guide! I'm totally bookmarking this, I have a feeling it'll be very useful. It's so detailed and precise, you did a really good job! Thanks again!
@flain
I'm very glad you found this useful! Good luck if you decide to do a project of your own!
Thank you so much for your tutorial, is very useful!!! Today you saved my life XD
Peace and love from Italy ^^
Isabella
I was searching for information to learn to draw anime, i am glad to have found this page because it give me more tips and information that other pages that are dedicated specific to draw anime.
Thank you very much for this post!!! and sorry for the bad english :D
im a few years late....
I'm glad there are still actual sources out here that don't rely on 3d printing. Brother, you are a godsend!
Post a Comment